10.31.2008

Friday Fun

Well, Thursdays over in the Unity forum are always so much fun that all the inspiration from blog hopping, challenges, and customer creations overflow into Friday for me. So, today I am sharing a project using one of my newest Unity sets Eco Chic. I recently found some wonderful and stylish reusable bags from envirosax. I love them because they can wrap up small enough to carry around in my purse or just keep in my glove compartment. So, I always have one on hand and I find that I am using them for more than just the grocery store. This year for Christmas I plan to give several of these bags as gifts and I thought it would be fun to use the Eco Chic set for the packaging of them. I also reused a container that I had kept from when I bought a kid's 2 piece flatware set from Target. Here is what I came up with:

Can you believe that the bags actually wrap up small enough to fit in this tube?! So first I adhered my paper around the tube with some red line tape, followed by the ribbon around each end. I punched out 2" circles for each end of the tube, stamping my leaf image in green and sponging around the edge of the circles with dark brown. After stamping my image and coloring in the leaves with my SU blender pen, I used my Crop-a-Dile to add brown eyelets to each corner. Then I threaded this great red raffia (I found it at Target for just $.99!) through the eyelets and around the tube, finishing it off with a bow.

Here are a few more pictures of the top of the tube, what the tube looked like before I decorated it, and one of the bags that I have to put into it.


Supplies: SU river rock cardstock; Reminisce Autumn Infinity paper; Unity Stamps (Eco Chic and Gratitude=Joy set); Colorbox dark brown and moss green ink; Michaels ribbon; Red Raffia from Target; Making Memories brown eyelets

Thanks for visiting! Have a fun and safe Halloween!

10.30.2008

It's Thursday!!!

So if you have not yet discovered Unity Stamp Company, today is the day to check them out! Every Thursday they have a lot of fun in their forum on SCS chatting, having challenges, and giving away some of their fabulous stamps. There are always great specials too if you decide to order and the whole day begins with a blog hop through the DT blogs which ends with the chance to win some Unity blog candy!! (Start HERE for the blog hop) So, today I am sharing a little Christmas tag I created yesterday using one of my newest Unity sets, Bitty Christmas Tags, and Kristina's color inspiration challenge.
These are definitely not colors I would normally put together so it was a bit of a challenge to figure out what I would do with them. But the red, sage, and white spoke Christmas to me so I figured I could just add a little pumpkin pie in as an accent. What do you think?

I'm off to Hip Hop with the Unity group...hope to see some of you in the forum too! Be sure to stop by tomorrow...I have a fun little project that I will be posting (hint: it's very 'GREEN').

10.29.2008

G is for Gratitude

Caardvark's current challenge is to create a monogram themed card. Using Amber Hight's sketch and some fabulous October Afternoon paper, I came up with this card.
I really love the bright blue and yellow together...I just might have to go back and get some more of this paper! :)

Extra details:
Making Memories Crystal Brads
Bazzill Basics Admiral blue cardstock
SU Not Quite Navy ink
Unity Stamp Company - Gratitude=Joy set
Ribbon - Unknown (but I got the last yard that my LSS had!)
Chipboard g - unknown
Decorative Scissors - Provo Craft

Thanks for stopping by! Hope you are having a bright and cheerful day...it is actually quite beautiful today here in Washington and not too cold!

10.26.2008

Pretty in Pink

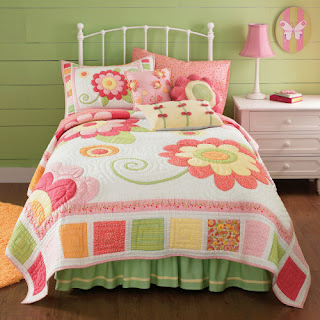
Oh, to be a little girl again! How adorable is this bedding?! Since I have two boys I don't get to buy any cute, pink, frilly things so when I saw that this was the SCS inspiration challenge for the week I just had to participate.

Obviously, I was inspired by the large flower, flourish, and the colors. I am having a lot of fun with this My Mind's Eye paper. The center green flower is popped up on a 3D foam square. I also used Bazzil Basics parakeet and pollen card stock, Stampin' Up sentiment from So Very set, and Doodlebug Designs paper frills.

I am off to have some long overdue 'Mommy time'! Hope you are enjoying your time today...thanks for taking some time to visit me!

10.25.2008

Treat Box

With Halloween only a week away, I thought I would share one more project I created with my BoBunny Fright Night paper. These little boxes from Michaels are so great, especially at just $1.00! First I painted it black and once it was dry I added the little white lines for a more detailed sewn look.


I only adhered the striped paper at the top so that I could bend the scalloped edge out to give it more dimension. I wrapped a thin ribbon around the base of the box, threading it through the buttons and then through the eyelets on the tag. I finished it off with a cute little orange flower and some satin ribbon.
I think I am going to fill this box up with some goodies and give it to my son for Halloween. He is very excited this year to be....BATMAN!
Hope you have a great weekend! I am off to swimming lessons and then a Halloween party for my youngest son! Thanks for stopping by!

10.24.2008

Count Your Blessings

Although I didn't get to spend too much time yesterday in the Unity forum, I did get a few cards done...and here is one of them.
Of course I used the fabulous Unity dream tree! I decorated it with some rhinestones (Me & My Big Ideas) and I painted my pumpkins with Twinkling H2Os so that they would shine a little too! I love this sentiment that I took from my Reminisce paper (Shades of Autumn collection) and thought I would take a moment to count some of my blessings this morning.
I feel so blessed to have my two beautiful boys, a loving husband, wonderful family and friends, and God in my life. I am also thankful for my health, that I am able to be a SAHM, and for getting to meet so many amazing and nice people in the stamping community. Now, I am going to go let all of my loved ones know how much they mean to me. I hope you take a few moments today to count your blessings! Thanks for visiting! I appreciate your comments and enjoy visiting your blogs too!

10.22.2008

Two great sketches + some fabulous paper =

a whole lot of inspiration! I am a sketch challenge kind of girl! A really good sketch helps to get my creative juices flowing and allows me to better visualize what elements I might want to include on my card. So if you love a good sketch too, I highly recommend visiting 2sketches4you. Usually each Monday, Laura or Kazan post one sketch, but this week there is also a bonus sketch from one of their Design team members, Lisette. My first card is based off of Laura's sketch #11.

Laura's sketch had a line for a sentiment but at first I wasn't sure if I wanted to cover up any of the patterned paper so I took a picture of it with & without a sentiment. What do you think?


I was going to stop here but then I felt that the card needed something more.
So, instead of having it be just a regular card I decided to use the striped paper as more of a 'frame' and allow the center panel to flip up to reveal the 'inside' of the card. I added a few of the circles and one of the flowers to the inside to make for greater interest when the card is open. All of the fabulous paper on this card is October Afternoon - Weathervane collection.


Now for my second card which is based off of Lisette's sketch.
This fun floral paper is from My Mind's Eye - Dazzling collection. Don't you just love the HUGE flower?! I only adhered the center of it so that I could gently bend the petals and give it some dimension. For the ribbon, I first threaded it through my eyelets and then took four separate pieces and slip knotted them around the threaded ribbon.

Thanks for visiting!

10.20.2008

It's raining, it's pouring...

Here in Washington this evening it has been pouring down buckets of rain, along with some flashes of lightening and booming thunder. So, to brighten things up a little I thought I would share this card with all of you.
First I took my Hero Arts sunflower stamp and using the rock and roll technique (with two different shades of yellow ink), I randomly stamped it all over my white card stock. For the tag I used a blender pen to color in the flowers (Stampin Up - thouroughly thankful set). I punched all the corners with my Fiskars heritage corner punch. Then I wrapped a large sheer yellow ribbon around the card, placed two flowers on top, and added a button in the middle. I popped the tag up on a 3D foam square and threaded a little ribbon through it. And while it looks like it connects to the button, I actually used a separate piece of the same ribbon to tie through the button holes. I just adhered the ribbon from the tag underneath the flower. To finish off the card, I used KaiserCraft Rhinestones to create a stem and leaves for the flower. Hope this card helps brighten your day a little too!

10.19.2008

Thank You

I just wanted to thank all of you who visit me here at my blog. I have been blogging for a month and a half now and greatly appreciate all of your comments. Here is a thank you card I made recently. Two of my favorite colors are blue and green, so this Scenic Route paper was just calling my name!


I found this great ribbon at Michaels...the colors match the paper perfectly and I love the ruffled edges. For the ribbon I just adhered a piece of it down 3/4 of my card. Then I took a separate piece and tied it into a bow, which I adhered with two glue dots. The two scalloped edge panels are popped up on 3D foam squares and to finish it off I added a mini metal flower tab (Making Memories). Thanks again for stopping by! I will post again later this week.

10.18.2008

2 Cards 4 You

Happy Saturday everyone! I hope you have some fun planned for yourself. I will be spending the day going to swimming lessons and playing with my boys. Last night I was so inspired by Kazan's sketch on 2sketches4you that I created two cards with it. If you ever need a good starting point for a card, I would definitely recommend checking out the 2sketches4you site. Every Monday, Kazan or Laura put up a fabulous new sketch and their Design Team creates some beautiful samples too! Here is my first card:

All of the patterned paper is from Scenic Route's Grafton line. I popped the center panel up on 3D foam squares, along with the flowers and leaf flourish. I also bent the petals of the larger flower to give it a little more dimension. Other details: Stamp: Michaels $1 bin, Cardstock: The Paper Company - Textured Mandarin, Making Memories Crystal Brads, A Muse Mini Dot Twinkle Stickers

Next, I made a Halloween card. I love how one sketch can inspire two completely different cards.

All of the paper for this card is from Bo Bunny. I tore around the sentiment and two center panels to give the card a more distressed look. I also popped them up on 3D foam squares. I bent the tree branches, popped the green circle with the cat up on a foam square, and used Doodlebug's black paper frill for some added dimension. The stamp is another great find from Michaels $1 bin! Thanks for visiting today! I will post again soon!

10.17.2008

HIp Hop and You Don't Stop!

Hey there all you Unity lovers!!! If you are visiting my blog and have not yet discovered Unity stamps they are fabulous! And over at their Splitcoast Stampers forum they have fun all week long, although Thursdays are the ultimate chat and giveaway day. So, last night I was able to pull myself away from the computer to create a card using the ever so popular Giggle Grove set.

I wanted to add a fun element to this card so I created a tri-fold and stamped *giggle prominently on the flap. I punched holes through the flap and the back piece of the card for the ribbon, which helps the flap stay down enough but it is still easy to open the card. I am still thinking about adding another fun element to this card like a pop-up in the middle when you open it or at least decorating the inside some. And I am thinking the flap needs a little something more too...maybe some eyelets or colorful gems around the scalloped edge. Thanks for stopping by!

Extra details:
Paper: The Paper Company - Bold Blue; Heidi Grace Designs - We are Family

Ink: Versafine Black

Stamps: Unity - Giggle Grove set

10.14.2008

A Little Sparkle

I have been having fun trying out some new products I was lucky enough to win on WCMD from Limelight Papercrafts. This card uses one of the Fiddle Dee frames (see post below) and Sugar Plum glitter (Pink Paislee Pixee Stix). First, I painted my chipboard frame with cranberry shimmering watercolor paint (Twinkling H2Os). I stamped my quote in Versafine Black ink and used tombo glue to trace over the word blossom. Then I sprinkled my glitter over it and added my Prima flower with a silver brad. I wraped silver cord around my frame and attached it to my card with glue dots. Finally, I cut out this butterfly from a scrap piece of paper I found in my stash and adhered it with a little foam square. Thanks for stopping by!

~ Kerry

10.13.2008

Fall is here!

I absolutely love fall here in the Pacific Northwest...the crisp air and all the trees with their beautiful colors. So, when I saw this great Reminisce Autumn paper in my LSS on Saturday I just had to have it. I used a new product, Fiddle Dee Frame Card Making Kit (by TaDa Creative Studios), that I won from Limelight Papercrafts on WCMD to create this card. I really like the dimension the window and chipboard frame give to the card. I used my Twinkling H2Os to paint the frame and the pumpkin.

I wasn't sure this card needed a sentiment since the paper has plenty of words so I took a few pictures without a sentiment first and then added a sentiment to see how it looked. What do you think? Is it too much?

Here are all the extra details for this card:
Patterned Paper: Reminisce - Autumn Infinity & Autumn Speaks

Stamps: Stampin' Up Thouroughly Thankful set
Ink: Colorbox fluid chalk - dark brown (used for stamps and inked around edges of card)
Creative Cafe Buttons & Michaels ribbon
EK Success 3D foam squares (used to pop up pumpkin and sentiment)

I hope you are enjoying fall wherever you are! Thanks for visiting!

10.11.2008

I {heart} this tree!

This tree from the Growing in Unity set was one of my first Unity Stamp purchases and I absolutely love it! It is so versatile and pretty. I have used it for a Halloween card, masked it to use it as a branch, and today I am sharing two cards I have created with it. First is a card I whipped up last night for the SCS limited supplies challenge.
First, I stamped the edges of the tree (in red) all around my piece of red cardstock to make a nice background. Then I stamped the tree in black onto another piece of Doodlebug Kisses card stock, cut it out, and adhered red twinkle stickers. I used decorative scissors to create the edge on the silver paper. I glued all the pieces to my card base, popped the tree up on dimensionals, and stamped my sentiment at the bottom, adding a few more A*Muse twinkle stickers and two silver brads (Making Memories).

Next, I created a holiday card. I love using the edges of this tree to create flourishes or a pretty frame for a sentiment. I wanted the sentiment to stand out but still have some gold in it so I stamped it in gold first and then stamped over it in black.
Details for this card: Cardstock - Bazzill Basics Ivy, Patterned Paper - Basic Grey Boxer Collection, Prima flowers, Gold cord, Brilliance archival gold ink

Thanks for stopping by! Hope you have a great day!


10.09.2008

A Quick Post

For those of you who visit my blog regularly I apologize for not posting yet this week. I worked on so many cards/projects over WCMD weekend but haven't made anything this week (been busy cleaning/organizing my crafting space!). So, I thought I would share one of the cards I made this past Friday at a Stampin' Up crafting night. We got to make 3 cards and a project and this little penguin card was my favorite. My friend (the Stampin' Up demonstrator) said she got the idea/template for this card from Splitcoast Stampers (of course!). Thanks for stopping by...I will definitely post again in the next few days.


(All products are Stampin' Up)